
Build notesAI & hardware
I turned a tiny retro monitor into an AI usage dashboard.
A little screen, a few scripts, and a way to see how much Claude and Codex quota I have left. Here’s how I built it.
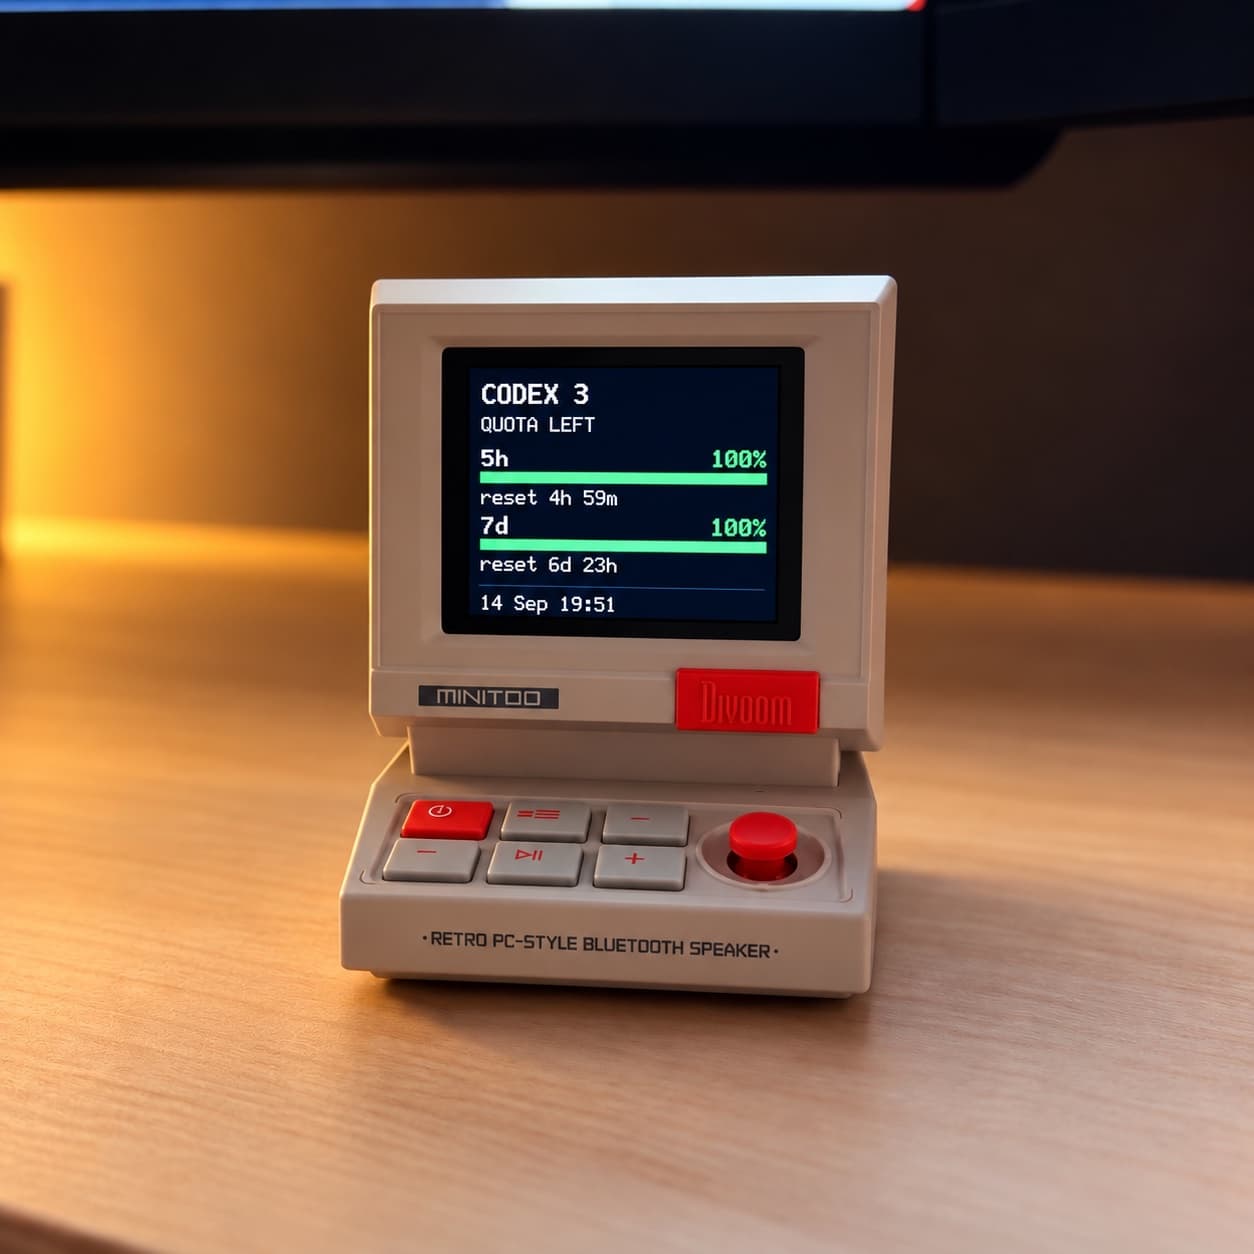
Divoom MiniToo The little monitor in this build.
I wanted a quick way to see how much Claude and Codex quota I had left across my accounts. So I connected a Divoom MiniToo to my Mac and gave those limits their own little screen.
It cycles through account cards with a remaining-quota bar and the time until each limit resets. My setup has one Claude account and three Codex accounts. A glance at the desk tells me which account still has room.
The idea came from watching Claire Vo work with a MiniToo in Lenny's Newsletter. I wanted to use the same kind of physical display for my own account quotas. Codex helped build the collector, draw the cards, and get the Bluetooth connection working.
You can build this two ways: give the prompts below to Codex or Claude Code and let it do the setup, or follow the manual steps yourself. The complete scripts are included at the end. Both routes cover the fixes that mattered in practice: separate API and management keys, Bluetooth permissions, and a full-width image format that removes the decorative side borders.
What we're building
There are three parts:
- CLIProxyAPI manages the provider logins and exposes a local API.
- A Python script reads the account credentials locally, requests quota data, and draws the display cards.
- A small Swift app sends those cards to the MiniToo over Bluetooth.
The data takes this path:
CLIProxyAPI-managed account files
              │
              ▼
      Python quota collector ──► Provider usage endpoints
              │                         │
              ◄─────────────────────────┘
              │
      160 × 128 account cards
              │
              ▼
      Native Mac Bluetooth app
              │
              ▼
         Divoom MiniToo
One detail matters: the collector below reads credentials from CLIProxyAPI's account files and calls the providers' usage endpoints directly. It does not get these limits from CLIProxyAPI's request counter or send the quota requests through its proxy.
These are account quota percentages, not dollar costs or a count of requests made through the proxy. The collector makes no model-generation requests. It polls every five minutes, and the MiniToo rotates cards every five seconds.
What you'll need
- A Mac with Bluetooth and Homebrew.
- A Divoom MiniToo. These instructions are for the MiniToo LCD model, not every Divoom pixel display.
- A supported Claude or Codex account that you can log into through CLIProxyAPI.
- Python 3 and Apple's command-line developer tools.
My device ran MiniToo firmware 2.4.0. The display transport uses community-documented Bluetooth commands. The provider quota endpoints are also subject to change; this is a personal utility, not an official provider or Divoom integration.
You can find the hardware on Divoom's MiniToo product page. The full-width image format comes from the community's MiniToo protocol findings, alongside the Mac Bluetooth work in divoom-minitoo-osx.
Option A: let Codex or Claude Code set it up
This is how I would approach it again: give the agent the goal, the working code, and a way to check the result.
Use Codex on your Mac or Claude Code with access to local files and Terminal. A chat session without access to your Mac can explain the steps, but cannot install the app or connect to your Bluetooth device.
Attach this Markdown file to the conversation, or give the agent a local copy it can read. If you are reading the website version, copy the article including all three code appendices into the conversation first. The prompts use those scripts as their starting point.
You will still need to complete account logins, pair the MiniToo, and approve any macOS permission prompts. Let the agent handle the files and commands between those steps.
Prompt 1: set up the whole project
Copy and paste this after supplying the article:
Set up the AI quota monitor described in the attached tutorial on this Mac.
Please do the work, rather than just giving me another list of instructions.
Use the three source-code appendices in the tutorial as the starting point.

First inspect what is already installed: Homebrew, Python, Apple's command-line
tools, CLIProxyAPI, its active configuration, saved account types, existing
Divoom Usage apps, and related login jobs. Reuse a working installation. Back up
any configuration you need to edit, preserve unrelated settings, and avoid
creating duplicate services. Keep this project outside any unrelated repository.

Install missing prerequisites and configure CLIProxyAPI to listen only on
127.0.0.1:8317. Use separate random proxy and management keys if valid keys are
not already configured. Keep secrets local; do not print tokens, credential-file
contents, or keys into this conversation. Tell me how to retrieve the management
key locally when I need to log in.

Help me connect the Claude and Codex accounts I want to display. Ask which
accounts I want to add when needed, and let me complete each browser login.
Verify the proxy and management dashboard. Check Auth Files for OAuth accounts;
an empty API-key provider list does not mean those logins are missing.

Create the monitor in ~/divoom-usage, or reuse its existing folder. Use a Python
virtual environment. Read credentials from CLIProxyAPI's configured auth-dir and
request provider quota data directly, as the tutorial explains. Do not copy
access tokens into the project or make model-generation requests to test quotas.
Show remaining percentages and reset times, use the reported Codex window
durations, and show unavailable data as an error rather than 100% remaining.

Generate a preview with generic account labels. Use 160 x 128 JPEG frames for
the full-width MiniToo screen without decorative side borders. Poll every five
minutes and rotate account cards every five seconds.

Find my paired MiniToo and use its actual Bluetooth address. If it is not paired,
ask me to pair it in System Settings and wait for me to confirm. Build the Swift
helper, package the local Divoom Usage app with its Bluetooth permission message,
and install the two user LaunchAgents from the tutorial. Also ensure CLIProxyAPI
starts at login. Reuse existing jobs instead of adding duplicates.

Guide me through any Bluetooth permission prompt. Verify the quota preview,
background jobs, and device acknowledgement. Then ask me whether the physical
screen shows the cards correctly. A successful write alone is not proof.

Check current upstream documentation if the installed versions differ from the
tutorial. Report any unresolved error clearly. At the end, give me a short summary
of what is running, where the files and logs are, and how to stop it.
Once the agent has finished and you have checked the physical screen, you can skip the manual installation sections. Keep the troubleshooting section handy.
Prompt 2: I already have CLIProxyAPI working
If you already use CLIProxyAPI, use this shorter prompt instead of Prompt 1:
CLIProxyAPI already works on this Mac. Add the Divoom MiniToo quota display from
the attached tutorial using its three code appendices.

Inspect and reuse my existing configuration, OAuth account files, and login
service. Preserve working settings and keys. Do not reinstall CLIProxyAPI or
create duplicate services. Keep credentials local and out of the conversation.

Create or update the Python collector and native Swift Bluetooth app in a
standalone folder. Use a virtual environment, generic account labels, actual
quota-window durations, and 160 x 128 JPEG cards without side borders. Generate
and check the preview before sending it to the device.

Find my paired MiniToo, or guide me through pairing if needed. Install the locally
signed app and the two monitor login jobs, reusing any existing installation.
Help me grant Bluetooth permission. Verify the jobs and device acknowledgement,
then ask me to confirm that the physical screen cycles through the correct cards.
Continue through the setup and debugging; pause when you need me to complete an
account login, hardware step, or system permission prompt.
Follow-up prompt: the screen has not changed
If the preview looks right but the MiniToo does not update, paste this into the same conversation:
The preview looks right, but the physical MiniToo screen has not changed.
Diagnose the existing installation before changing anything.

Check that the collector updates display.bin, that the display app is running,
that the configured address matches the paired MiniToo, and that the packaged
app has Bluetooth permission. Inspect the transport log for the device
acknowledgement, not just successful writes. Use the tutorial's Bluetooth Classic
channel 1 transport and check packet validation and transfer pacing.

If a power cycle is needed, ask me to turn the MiniToo off and on, close the
Divoom phone app, and reconnect it to the Mac. Wait for my confirmation before
retrying. Preserve my account configuration. Verify the acknowledgement after
the fix and ask me to confirm the physical display before calling it resolved.
Option B: follow the manual steps
If you prefer to run the commands yourself, start here. The scripts are the same ones supplied to the agent in Option A.
1. Install CLIProxyAPI
CLIProxyAPI is a local proxy that makes supported AI services available through compatible API interfaces. It supports several providers and can manage multiple accounts through OAuth logins.
For this project, it gives us a place to manage the Claude and Codex accounts. It does not create extra quota or increase the limits on those accounts.
In Terminal, run:
brew install cliproxyapi python
If Apple's developer tools are not installed, run this too and complete the installation window:
xcode-select --install
The official Homebrew setup guide puts the CLIProxyAPI configuration at $(brew --prefix)/etc/cliproxyapi.conf. That normally means /opt/homebrew/etc/cliproxyapi.conf on Apple Silicon or /usr/local/etc/cliproxyapi.conf on an Intel Mac.
2. Set the local address and two keys
Generate two different random keys. Run this command twice and keep both results in your password manager:
openssl rand -hex 32
The first will be the proxy API key used by API clients. The second will be the management key used to log into the browser dashboard.
Open the configuration:
nano "$(brew --prefix)/etc/cliproxyapi.conf"
Find and edit the existing settings so they look like this. Replace both placeholder strings with the keys you generated. Do not add a second copy of a setting that is already present.
host: "127.0.0.1"
port: 8317
auth-dir: "~/.cli-proxy-api"

api-keys:
  - "PASTE_YOUR_FIRST_RANDOM_KEY_HERE"

remote-management:
  allow-remote: false
  secret-key: "PASTE_YOUR_SECOND_RANDOM_KEY_HERE"
Under api-keys, remove any unused example keys. Leaving template values there can cause CLIProxyAPI to disable its proxy endpoints.
Keep the indentation shown above. Lines beginning with # are comments, so the settings you want to use must not start with #.
In nano, press Control + O, then Enter to save. Press Control + X to return to Terminal.
Binding to 127.0.0.1 keeps this setup on your Mac. There is no need to enable remote management for the monitor.
The example configuration documents these options. An empty management secret disables the management routes. CLIProxyAPI can replace the secret in the file with a hash after startup; log in with the original key you saved, not that hash.
3. Log into your accounts
For a Codex account:
cliproxyapi --config "$(brew --prefix)/etc/cliproxyapi.conf" --codex-login
For a Claude account:
cliproxyapi --config "$(brew --prefix)/etc/cliproxyapi.conf" --claude-login
Complete each browser login. Repeat for each distinct account you want on the display, selecting the intended account in the browser each time.
CLIProxyAPI saves the credentials in the configured auth-dir. Treat that directory as private. The provider-specific instructions are in the Codex login guide and Claude login guide.
Start the service:
brew services start cliproxyapi
If it was already running when you changed its configuration, restart it:
brew services restart cliproxyapi
Running brew services start as your normal Mac user also registers the service to start when you log in. You do not need to add another copy to Login Items. Check it with:
brew services list
4. Check the proxy and management dashboard
Open the local management dashboard and enter your management key.
The Auth Files section should show your saved OAuth accounts. An empty AI Providers page can be normal: that page manages provider API-key configurations, while your accounts may have been added through OAuth. You do not need to register with a third-party service advertised on a Quick Start page to follow this tutorial.
You can also test the proxy from Terminal. The following uses macOS's default zsh shell. After read, paste your proxy API key and press Enter; the input stays hidden.
read -r -s PROXY_KEY
curl --fail-with-body http://127.0.0.1:8317/v1/models \
  -H "Authorization: Bearer $PROXY_KEY"
unset PROXY_KEY
A JSON model list confirms that the proxy endpoint is reachable and accepts your key. It does not prove that every listed model can complete a request.
Opening http://127.0.0.1:8317/v1 directly in a browser may return 404. That is an API base path, not a web page. Use /management.html for the dashboard.
5. Pair the MiniToo with your Mac
Turn the MiniToo on and open System Settings → Bluetooth on the Mac. Pair the device. Mine appeared as Divoom MiniToo-Audio.
The audio name is slightly misleading for this project. The display commands use a Bluetooth Classic serial connection called RFCOMM. The helper below sends them over channel 1.
A USB cable can supply power, but this tutorial sends the display data over Bluetooth.
If you have the Divoom phone app open, close it before testing the Mac connection. During my setup, the Mac reported successful writes while the screen did not change. Turning the MiniToo off and on, closing the phone app, and reconnecting it to the Mac resolved that problem.
6. Create the display project
Keep this folder in a permanent location. The login jobs will refer to files inside it.
mkdir -p "$HOME/divoom-usage"
cd "$HOME/divoom-usage"
python3 -m venv .venv
.venv/bin/python -m pip install 'Pillow>=11,<13' 'requests>=2.32,<3' 'PyYAML>=6,<7'
export CLIPROXY_CONFIG="$(brew --prefix)/etc/cliproxyapi.conf"
Save the three source blocks at the end of this article into this folder with these exact names:
- Appendix A →
usage_display.py: quota collector and image renderer. - Appendix B →
Display.swift: native Bluetooth helper. - Appendix C →
install_login.py: app packaging and login-job installer.
Save only the contents of each code block, without the surrounding Markdown backticks.
Run the collector once:
.venv/bin/python usage_display.py
open state/preview.gif
The preview should show one card per supported account. The script creates generic labels such as CLAUDE 1 and CODEX 1. You can edit those labels in accounts.json; keep them short enough to fit the screen. That file maps private account filenames to labels, so do not publish it.
Check the preview before moving on. An error card is useful evidence: it means the script ran but could not get that account's quota. It should never turn missing data into “100% remaining.”
What the quota numbers mean
The collector calculates:
remaining percentage = 100 − used percentage
For Codex, it reads the actual duration reported for each limit. A primary limit is not necessarily five hours; account plans can report different windows. Claude's supported fields here are the five-hour and seven-day windows.
This implementation displays up to two main windows per account. It does not attempt to display every possible model-specific allowance, credit balance, or paid overage setting.
The requests use the same endpoints documented in the community cliproxy-usage implementation:
- Codex:
https://chatgpt.com/backend-api/wham/usage - Claude:
https://api.anthropic.com/api/oauth/usage
The collector reads access tokens into memory for those requests. It does not write copies into its output files. It also does not implement token refresh: if an account needs a new login, renew it through CLIProxyAPI.
The timestamp at the bottom is the last collection time. Reset countdowns are redrawn on each five-minute poll, rather than ticking every second. If the Mac sleeps or collection stops, the MiniToo can keep showing its last uploaded cards, so that timestamp matters.
7. Build the Bluetooth helper
From the project folder, compile the Swift source:
swiftc Display.swift -o display -framework AppKit -framework IOBluetooth
Then list the paired Divoom devices:
./display --list
Allow Bluetooth access if macOS asks. The output should contain the device name and a Bluetooth address. Copy your own address into this variable, replacing the example value:
export DIVOOM_ADDRESS="AA:BB:CC:DD:EE:FF"
The helper uses the community-documented transfer format, including a device acknowledgement. A successful Bluetooth write alone was not enough to prove that the screen had updated during my setup.
Why the images are 160 × 128
My first version used square 128 × 128 images. The MiniToo showed decorative borders on the left and right.
The final version sends 160 × 128 JPEG frames using the full-width MiniToo image format. That removed the borders on my device. This is already implemented in Appendix A; there is no separate border switch to find in the app.
8. Install the app and start it at login
Once the preview is correct and you have the device address, run:
.venv/bin/python install_login.py "$DIVOOM_ADDRESS"
The installer creates a local Divoom Usage.app in ~/Applications, signs it locally, and starts two user login jobs:
| Job | What it does |
|---|---|
local.divoom-usage.collector | Refreshes the quota cards every five minutes. |
local.divoom-usage.display | Runs the Bluetooth app and sends new cards to the MiniToo. |
These are macOS LaunchAgents, which run in your logged-in user session. They start after you log in following a restart; they do not run while the Mac is shut down or asleep. Keep the project folder in place.
Click Allow when macOS asks whether Divoom Usage can use Bluetooth. Permission granted to Terminal during the device-listing step may not cover the packaged app. If you missed the prompt, check System Settings → Privacy & Security → Bluetooth.
The installer refuses to overwrite an existing app or either of these login jobs. If you already have this monitor installed, do not create a second copy.
Watch the transfer log:
tail -f state/transport.log
A completed transfer should include:
display transfer: written=true acknowledged=true
Then check the physical screen. It should cycle through the same cards as the preview. Press Control + C to stop watching the log; that leaves the background services running.
You can inspect the two jobs with:
launchctl print "gui/$(id -u)/local.divoom-usage.collector"
launchctl print "gui/$(id -u)/local.divoom-usage.display"
Troubleshooting
| What you see | What to check |
|---|---|
unsafe_example_api_key | Replace all template entries under api-keys, then restart CLIProxyAPI. |
404 at /v1 in the browser | Open /management.html. Test the API at /v1/models with the proxy key. |
| “Management API not found” on dashboard login | Check that remote-management.secret-key is set in the config the service actually uses, then restart it. |
| Dashboard rejects a key | Use the original management key. The proxy API key and any stored hash serve different purposes. |
| Zero entries under AI Providers | Check Auth Files for OAuth accounts. API-key provider entries are separate. |
KeyError: 'CLIPROXY_CONFIG' | Run the export CLIPROXY_CONFIG=... command again in the current Terminal session. The installer saves the path for the login jobs. |
NO ACCOUNTS in the preview | Check the configured auth-dir and complete a supported Claude or Codex OAuth login. |
login needed, read failed, or an HTTP error on a card | Check the account login and network connection. Provider endpoint changes can also break collection. |
| Bluetooth writes succeed, but no screen change | Power-cycle the MiniToo, close the phone app, reconnect to the Mac, and check the acknowledgement in the log. |
| The final app cannot connect | Check Bluetooth permission for Divoom Usage itself and confirm the paired-device address. |
| Decorative side borders remain | Confirm that you used the 160 × 128 JPEG encoder in Appendix A. Other firmware may behave differently. |
| The numbers stop changing | Check the displayed timestamp and state/collector.error.log. Sleeping or disconnected devices can retain the last image. |
For collector errors:
tail -n 30 state/collector.error.log
For app-launch errors:
tail -n 30 state/display.error.log
The files under state contain the local output and logs. Keep the credential directory and accounts.json out of public repositories. The source files themselves contain no account tokens.
Stopping the monitor
To stop both jobs for the current login session:
launchctl bootout "gui/$(id -u)/local.divoom-usage.collector"
launchctl bootout "gui/$(id -u)/local.divoom-usage.display"
The display job launches a separate app. If Divoom Usage is still running, quit it through Activity Monitor. The device may continue displaying the last image even after the software stops.
To prevent the monitor starting at your next login, also move these two files out of ~/Library/LaunchAgents:
local.divoom-usage.collector.plist
local.divoom-usage.display.plist
CLIProxyAPI is a separate service. Leave it running if you use it for other clients. To stop it and remove its Homebrew login registration:
brew services stop cliproxyapi
The complete build
Make it your own.
All three scripts are included below. Download the full tutorial to give your coding agent the instructions and source code together.
Download tutorial (.md)Appendix A: usage_display.py
usage_display.pySave this in the project folder. It discovers the supported accounts, requests their quotas, generates a preview, and atomically replaces the file read by the Bluetooth helper.
#!/usr/bin/env python3
"""Read CLIProxyAPI account quotas and render a MiniToo animation. No token copies."""
import argparse
import concurrent.futures
from datetime import datetime, timezone
import json
import io
import math
import os
from pathlib import Path
import struct
import time

from PIL import Image, ImageDraw, ImageFont
import requests
import yaml

ROOT = Path(__file__).resolve().parent
STATE = ROOT / 'state'
CONFIG = Path(os.environ['CLIPROXY_CONFIG']).expanduser()
FONT = '/System/Library/Fonts/Monaco.ttf'

def percent(value):
    if isinstance(value, bool) or not isinstance(value, (int, float)) or not math.isfinite(value):
        return None
    return max(0, min(100, 100 - value))

def window(label, item, used_key, reset_key):
    if not isinstance(item, dict) or percent(item.get(used_key)) is None:
        return None
    return {'label': label, 'remaining': percent(item[used_key]), 'reset': item.get(reset_key)}

def parse_quota(kind, body):
    if kind == 'claude':
        candidates = [window(label, body.get(key), 'utilization', 'resets_at')
                      for key, label in [('five_hour', '5h'), ('seven_day', '7d')]]
    else:
        candidates = []
        rate = body.get('rate_limit') or {}
        for key in ['primary_window', 'secondary_window']:
            item = rate.get(key)
            if not isinstance(item, dict):
                continue
            seconds = item.get('limit_window_seconds')
            label = 'limit'
            if isinstance(seconds, (int, float)) and seconds > 0:
                label = f'{seconds / 86400:g}d' if seconds % 86400 == 0 else f'{seconds / 3600:g}h'
            candidates.append(window(label, item, 'used_percent', 'reset_at'))
    return [x for x in candidates if x is not None]

def fetch_account(item):
    path, label = item
    account = {'label': label, 'windows': [], 'status': 'unavailable'}
    try:
        auth = json.loads(path.read_text())
        if auth.get('disabled'):
            account['status'] = 'disabled'
            return account
        kind = auth['type']
        headers = {'Authorization': 'Bearer ' + auth['access_token'], 'Accept': 'application/json', 'User-Agent': 'divoom-usage/1.0'}
        if kind == 'codex':
            url = 'https://chatgpt.com/backend-api/wham/usage'
            headers['ChatGPT-Account-Id'] = auth['account_id']
        else:
            url = 'https://api.anthropic.com/api/oauth/usage'
            headers['anthropic-beta'] = 'oauth-2025-04-20'
        response = requests.get(url, headers=headers, timeout=20, allow_redirects=False)
        if response.status_code != 200:
            account['status'] = 'login needed' if response.status_code in [401, 403] else f'HTTP {response.status_code}'
            return account
        account['windows'] = parse_quota(kind, response.json())
        account['status'] = 'ok' if account['windows'] else 'no quota data'
    except (requests.RequestException, ValueError, KeyError, OSError):
        account['status'] = 'read failed'
    return account

def accounts():
    cfg = yaml.safe_load(CONFIG.read_text())
    auth_dir = Path(cfg['auth-dir']).expanduser()
    labels_path = ROOT / 'accounts.json'
    labels = json.loads(labels_path.read_text()) if labels_path.exists() else {}
    found = []
    counts = {'codex': 0, 'claude': 0}
    for path in sorted(auth_dir.glob('*.json')):
        try:
            kind = json.loads(path.read_text()).get('type')
        except (ValueError, OSError):
            continue
        if kind not in counts:
            continue
        counts[kind] += 1
        label = labels.get(path.name)
        if label is None:
            number = 1
            while f'{kind.upper()} {number}' in labels.values():
                number += 1
            label = f'{kind.upper()} {number}'
            labels[path.name] = label
        found.append((path, label))
    labels_path.write_text(json.dumps(labels, indent=2) + '\n')
    labels_path.chmod(0o600)
    return found

def reset_text(value):
    if value is None:
        return 'reset not given'
    try:
        date = datetime.fromisoformat(value.replace('Z', '+00:00')) if isinstance(value, str) else datetime.fromtimestamp(value, timezone.utc)
        seconds = max(0, int(date.timestamp() - time.time()))
        if seconds >= 86400:
            return f'reset {seconds//86400}d {seconds%86400//3600}h'
        return f'reset {seconds//3600}h {seconds%3600//60}m'
    except (ValueError, TypeError, OverflowError):
        return 'reset unknown'

def render(snapshot):
    frames = []
    small = ImageFont.truetype(FONT, 9)
    font = ImageFont.truetype(FONT, 11)
    title = ImageFont.truetype(FONT, 13)
    for account in snapshot['accounts']:
        img = Image.new('RGB', (160, 128), '#0b111b')
        draw = ImageDraw.Draw(img)
        draw.text((6, 5), account['label'][:14], font=title, fill='#f1f5f9')
        draw.text((6, 23), 'QUOTA LEFT', font=small, fill='#94a3b8')
        if account['status'] != 'ok':
            draw.text((6, 52), account['status'], font=font, fill='#ffb454')
        for i, w in enumerate(account['windows'][:2]):
            y = 40 + i * 35
            value = w['remaining']
            color = '#41dca0' if value > 30 else '#ffb454' if value > 10 else '#ff6070'
            draw.text((6, y), w['label'], font=font, fill='#e2e8f0')
            draw.text((154, y), f'{value:.0f}%', anchor='ra', font=font, fill=color)
            draw.rectangle((6, y+14, 153, y+18), fill='#273142')
            if value > 0:
                draw.rectangle((6, y+14, 6+round(147*value/100), y+18), fill=color)
            draw.text((6, y+21), reset_text(w['reset']), font=small, fill='#94a3b8')
        draw.line((6, 113, 154, 113), fill='#273142')
        stamp = datetime.fromtimestamp(snapshot['fetched_at']).strftime('%d %b %H:%M')
        draw.text((6, 117), stamp, font=small, fill='#94a3b8')
        frames.append(img)
    if not frames:
        img = Image.new('RGB', (160,128), '#0b111b')
        ImageDraw.Draw(img).text((5,50), 'NO ACCOUNTS', font=font, fill='#ffb454')
        frames.append(img)
    return frames

def packet(body):
    data = struct.pack('<H', len(body) + 3) + b'\x8b' + body
    return b'\x01' + data + struct.pack('<H', sum(data) & 0xffff) + b'\x02'

def encode(frames):
    if not 1 <= len(frames) <= 255:
        raise ValueError('Device supports 1..255 frames')
    # Full-width MiniToo LCD format: 8 rows x 10 columns of 16px cells.
    payload = struct.pack('>BBHBB', 0x23, len(frames), 5000, 8, 10)
    for frame in frames:
        if frame.size != (160, 128):
            raise ValueError('Full-width MiniToo frames must be 160x128')
        image_bytes = io.BytesIO()
        frame.convert('RGB').save(image_bytes, format='JPEG', quality=95, subsampling=0)
        jpeg = image_bytes.getvalue()
        payload += b'\x01' + struct.pack('>I', len(jpeg)) + jpeg
    size = struct.pack('<I', len(payload))
    packets = [packet(b'\x00' + size)]
    packets += [packet(b'\x01' + size + struct.pack('<H', n) + payload[pos:pos+256])
                for n, pos in enumerate(range(0, len(payload), 256))]
    return b''.join(struct.pack('<H', len(p)) + p for p in packets)

def update():
    STATE.mkdir(exist_ok=True, mode=0o700)
    with concurrent.futures.ThreadPoolExecutor(max_workers=4) as pool:
        result = list(pool.map(fetch_account, accounts()))
    snapshot = {'fetched_at': time.time(), 'accounts': result}
    (STATE/'usage.json').write_text(json.dumps(snapshot, indent=2) + '\n')
    frames = render(snapshot)
    frames[0].save(STATE/'preview.png')
    frames[0].save(STATE/'preview.gif', save_all=True, append_images=frames[1:], duration=5000, loop=0)
    temp = STATE/'display.tmp'
    temp.write_bytes(encode(frames))
    temp.replace(STATE/'display.bin')
    print(json.dumps({'event':'quota_updated','accounts':len(result),'ok':sum(a['status']=='ok' for a in result)}), flush=True)

def main():
    os.umask(0o077)
    parser = argparse.ArgumentParser()
    parser.add_argument('--watch', action='store_true')
    args = parser.parse_args()
    while True:
        update()
        if not args.watch:
            break
        time.sleep(300)

if __name__ == '__main__':
    main()
Appendix B: Display.swift
Display.swiftSave this alongside the Python script. It keeps the Bluetooth connection open, validates outgoing packets, and waits for the MiniToo acknowledgement.
import Foundation
import AppKit
import IOBluetooth

// MiniToo wire format documented by alvinunreal/divoom-minitoo-osx.
// This helper keeps one Bluetooth Classic connection and watches an atomic packet file.
final class Receiver: NSObject, IOBluetoothRFCOMMChannelDelegate {
    private var received = Data()
    private let lock = NSLock()
    func summary() -> String { lock.lock(); defer { lock.unlock() }; return received.prefix(80).map { String(format: "%02x", $0) }.joined() }
    func reset() { lock.lock(); defer { lock.unlock() }; received.removeAll() }
    func contains(_ bytes: Data) -> Bool { lock.lock(); defer { lock.unlock() }; return received.range(of: bytes) != nil }
    func rfcommChannelData(_ channel: IOBluetoothRFCOMMChannel!, data pointer: UnsafeMutableRawPointer!, length: Int) {
        lock.lock(); defer { lock.unlock() }
        received.append(Data(bytes: pointer, count: length))
        if received.count > 65536 { received = Data(received.suffix(32768)) }
    }
}
func pump(_ seconds: Double) {
    let deadline = Date().addingTimeInterval(seconds)
    while Date() < deadline {
        RunLoop.current.run(until: deadline)
        // A worker run loop can return immediately when it has no event sources.
        let remaining = deadline.timeIntervalSinceNow
        if remaining > 0 { Thread.sleep(forTimeInterval: min(remaining, 0.01)) }
    }
}
func fail(_ message: String) -> Never { fputs(message + "\n", stderr); exit(1) }
let application = NSApplication.shared
application.setActivationPolicy(.accessory)
application.finishLaunching()
let args = CommandLine.arguments
if args.count == 2 && args[1] == "--list" {
    for case let device as IOBluetoothDevice in IOBluetoothDevice.pairedDevices() ?? [] {
        if (device.name ?? "").lowercased().contains("divoom") {
            print("\(device.name ?? "Divoom") | \(device.addressString ?? "unknown") | connected=\(device.isConnected())")
        }
    }
    exit(0)
}
guard args.count == 3 else { fail("Usage: display DEVICE_ADDRESS PACKET_FILE, or display --list") }
DispatchQueue.global(qos: .utility).async {
guard let device = IOBluetoothDevice(addressString: args[1]) else { fail("Invalid Bluetooth address") }
let path = URL(fileURLWithPath: args[2])
freopen(path.deletingLastPathComponent().appendingPathComponent("transport.log").path, "a", stdout)
let receiver = Receiver()
var channel: IOBluetoothRFCOMMChannel?
var sent: Data?
var nextAttempt = Date.distantPast
while true {
    pump(2)
    if Date() < nextAttempt { continue }
    guard let data = try? Data(contentsOf: path), data != sent else { continue }
    // Validate the entire packet file before writing anything to the device.
    var packets: [Data] = []
    var offset = 0
    var valid = !data.isEmpty && data.count < 1_000_000
    while valid && offset < data.count {
        if offset + 2 > data.count { valid = false; break }
        let count = Int(data[offset]) | Int(data[offset+1]) << 8
        offset += 2
        if count < 7 || count > 512 || offset + count > data.count { valid = false; break }
        let packet = Data(data[offset..<offset+count])
        let declared = Int(packet[1]) | Int(packet[2]) << 8
        let checksum = packet[1..<count-3].reduce(0) { $0 + Int($1) } & 0xffff
        let stored = Int(packet[count-3]) | Int(packet[count-2]) << 8
        if packet[0] != 1 || packet[count-1] != 2 || packet[3] != 0x8b || declared != count-4 || checksum != stored { valid = false; break }
        packets.append(packet)
        offset += count
    }
    guard valid else { fail("Invalid display packet file") }
    if channel?.isOpen() != true {
        var opened: IOBluetoothRFCOMMChannel?
        let status = device.openRFCOMMChannelSync(&opened, withChannelID: 1, delegate: receiver)
        guard status == kIOReturnSuccess, let opened else {
            print("display connection failed: \(status); retry in 30s"); fflush(stdout)
            nextAttempt = Date().addingTimeInterval(30)
            continue
        }
        channel = opened
        pump(0.4)
    }
    receiver.reset()
    var success = true
    for (index, packet) in packets.enumerated() {
        var bytes = packet
        let status = bytes.withUnsafeMutableBytes { ptr in
            channel!.writeSync(ptr.baseAddress, length: UInt16(ptr.count))
        }
        if status != kIOReturnSuccess { success = false; break }
        pump(index == 0 ? 0.6 : 0.012)
    }
    pump(4)
    let ack = Data([1,9,0,4,0xbd,0x55,0x13,1,5,0,0x38,1,2])
    let confirmed = receiver.contains(ack)
    print("device reply: \(receiver.summary())")
    print("display transfer: written=\(success) acknowledged=\(confirmed)"); fflush(stdout)
    if success && confirmed { sent = data }
    else { nextAttempt = Date().addingTimeInterval(30) }
}

}
RunLoop.main.run()
Appendix C: install_login.py
install_login.pySave this alongside the other two files. It installs the locally signed app and registers the collector and display jobs for your Mac user. It does not change your CLIProxyAPI configuration.
#!/usr/bin/env python3
"""Install the local app and two login jobs. Run once after the preview works."""
import os
from pathlib import Path
import plistlib
import re
import shutil
import subprocess
import sys

ROOT = Path(__file__).resolve().parent
HOME_DIR = Path.home()
APP = HOME_DIR / 'Applications' / 'Divoom Usage.app'
AGENTS = HOME_DIR / 'Library' / 'LaunchAgents'
STATE = ROOT / 'state'
LABELS = ['local.divoom-usage.collector', 'local.divoom-usage.display']

if len(sys.argv) != 2 or not re.fullmatch(r'(?:[0-9A-Fa-f]{2}[:-]){5}[0-9A-Fa-f]{2}', sys.argv[1]):
    sys.exit('Usage: python install_login.py YOUR_BLUETOOTH_ADDRESS')
address = sys.argv[1].replace('-', ':').upper()
config_value = os.environ.get('CLIPROXY_CONFIG')
if not config_value:
    sys.exit('Set CLIPROXY_CONFIG to your CLIProxyAPI config path first.')
config = Path(config_value).expanduser().resolve()
for required in [config, ROOT/'display', ROOT/'usage_display.py',
                 ROOT/'.venv/bin/python', STATE/'display.bin']:
    if not required.exists():
        sys.exit(f'Missing required file: {required}')
for target in [APP, *(AGENTS/f'{label}.plist' for label in LABELS)]:
    if target.exists():
        sys.exit(f'Already exists: {target}. Stop here if you already installed this monitor.')

os.umask(0o077)
(APP/'Contents/MacOS').mkdir(parents=True)
AGENTS.mkdir(parents=True, exist_ok=True)
shutil.copy2(ROOT/'display', APP/'Contents/MacOS/display')
info = {
    'CFBundleExecutable': 'display',
    'CFBundleIdentifier': 'local.divoom-usage.app',
    'CFBundleName': 'Divoom Usage',
    'CFBundlePackageType': 'APPL',
    'CFBundleShortVersionString': '1.0',
    'CFBundleVersion': '1',
    'LSUIElement': True,
    'NSBluetoothAlwaysUsageDescription': 'Send account quota cards to your Divoom MiniToo.',
    'NSBluetoothPeripheralUsageDescription': 'Send account quota cards to your Divoom MiniToo.',
}
(APP/'Contents/Info.plist').write_bytes(plistlib.dumps(info))
subprocess.run(['/usr/bin/codesign', '--force', '--sign', '-', str(APP)], check=True)

commands = [
    [str(ROOT/'.venv/bin/python'), str(ROOT/'usage_display.py'), '--watch'],
    ['/usr/bin/open', '-g', '-W', str(APP), '--args', address, str(STATE/'display.bin')],
]
for label, command in zip(LABELS, commands):
    name = label.rsplit('.', 1)[1]
    job = {
        'Label': label,
        'ProgramArguments': command,
        'WorkingDirectory': str(ROOT),
        'EnvironmentVariables': {'CLIPROXY_CONFIG': str(config)},
        'RunAtLoad': True,
        'KeepAlive': True,
        'ThrottleInterval': 30,
        'ProcessType': 'Background',
        'StandardOutPath': str(STATE/f'{name}.log'),
        'StandardErrorPath': str(STATE/f'{name}.error.log'),
    }
    path = AGENTS/f'{label}.plist'
    path.write_bytes(plistlib.dumps(job))
    subprocess.run(['/bin/launchctl', 'bootstrap', f'gui/{os.getuid()}', str(path)], check=True)
print('Installed. Allow Bluetooth access for Divoom Usage when macOS asks.')
print(f'Check transfer results in {STATE / "transport.log"}')
Thanks for reading.
Back to all notes